
Select grid and scale
For the first atlas, make a grid 3×3 level 1: one map covers 256×256 blocks, the entire wall - 768×768. Level 0 gives 128×128, each next level doubles the side. Reference: Minecraft: framed maps.
Prepare 9 cards, 9 enlargement papers and 9 frames. The frame costs 1 leather and 8 sticks; for nine you need 9 leather and 72 sticks. Cartographer's table: 2 paper and 4 board.
Get neighboring areas
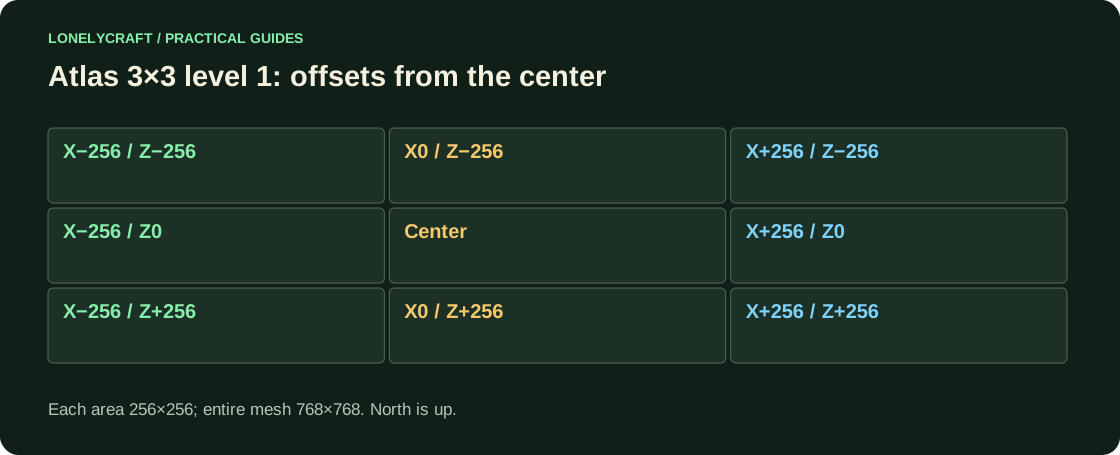
Reveal the central card and increase it across the table with one paper to level 1. Write down the activation coordinates. From this point, move 256 in X or Z, opening a separate map at each new location and enlarging it to the same level.
3×3 requires offsets X=-256/0/+256 and Z=-256/0/+256. Maps are snapped to the world grid rather than being centered on the click point; an equal offset by the width of the map maintains the correct neighborhood. Don't increase just one card from a set.
Recording coordinates and road signs are described in the manual: Maps and signposts: make your world easier to navigate.
Fill and hang at cardinal points
Walk through each area with the map in hand until the white voids of the desired area disappear. On the wall, north is at the top (-Z), east is at the right (+X). Match rivers and roads at the seams.
If the seam does not match, compare the scale, frame rotation and area number. Don't create a new map in the same place hoping to get the eastern half. For a copy, use the filled and blank cards on the table; the glass panel captures the image if an archive is needed.
The list of replenishable supplies for the trip is given here: A biome expedition: bring home the resources you need.